Application Whitelisting on Windows and App Execution Analytics (using AppLocker, AppIDSvc and Splunk)

If you familiar with security compliance requirements such as PCI DSS or HIPAA – one of the requirements is “application whitelisting”. Application whitelisting is the solution that allows execution of pre-approved apps and scripts only and disallow rest.

Application whitelisting can be done using many tools – in this example I will discuss how to get application whitelisting done using in-build Windows tools; I will use Windows AppLocker utility to implement application whitelisting. I will discuss setting up Splunk for AppLocker, so that we get real time visibility/analytics of application whitelisting and alerting.

This HOWTO got two parts –

Part 1 – this discuss technical steps regarding how to setup application whitelisting on Windows platform and push the settings to bunch of windows computers.

Part 2 – this discuss technical steps regarding how to get visibility, analytics and alerts about the application whitelisting using Splunk (e.g. application whitelisting logs showing which apps are allowed, which are denied, who executed the app, when, from where etc).

Part 1 – Setting up the Application Whitelisting on Windows

Following are the steps for Part 1.

Step1: Start the “Application Identity” (AppIDSvc) service & set to start automatic

AppIDSvc service is a Microsoft service used by AppLocker to determine and verify the identity of an application. Without AppIDSvc AppLocker is unable to determine and verify application, scripts, installers and executables.

AppWhitelist1-AppIDSvc

Step2: Setup Application Whitelisting using “Local Group Policy Editor” or “Group Policy Management Console”

AppLocker settings are available within “Computer Configuration -> Windows Settings -> Security Settings -> Application Control Policies -> AppLocker”. In an ideal environment all the AppLocker settings should combines into a single Group Policy Object (GPO) and pushed onto computers via Active Directory.

Set the policy “Enforcement rules” first

Right click on the AppLocker -> go to Properties -> Select “Enforcement rules” for both Executables and Scripts. Enforcement rule enforces “allow” and “deny” operations.

“Executable rules” are applied to application programs installed on the Windows OS.
“Scripts rules” are applied to all scripts available on the Windows OS.

“Audit only” – this setting does not prevent execution rather it generates audit logs only about what items are executed on the Windows OS and who executed it.

AppWhitelist2-AppLockerProperty

Set the Executable Rules

Set allow or deny action to executable application here; few options available here –

Executable Rules based on “Publisher” – allow all signed software by authorised publisher.
Executable Rules based on “Path” – allow specific file or folder. I prefer this.
Executable Rules based on “File hash” – this is for application which are not sighed.

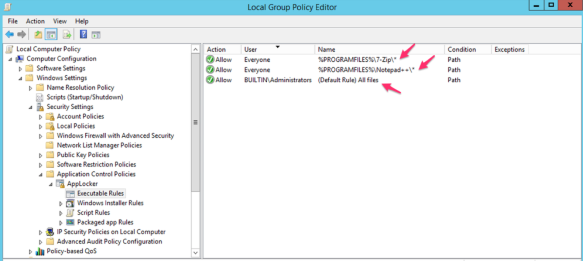
Example screenshot of “Executable Rules” – in this example users (everyone) are allowed ONLY to execute “7-Zip” and “Notepad++” which are installed within “C:\Program Files\” or “C:\Program Files (86)\”; whereas “Administrators” can execute all; there is a “Deny” by default for rest.

Interestingly the same variable “%PROGRAMFILES%” returns both “C:\Program Files\” & “C:\Program Files (x86)”.

AppWhitelist3-LocalGPO

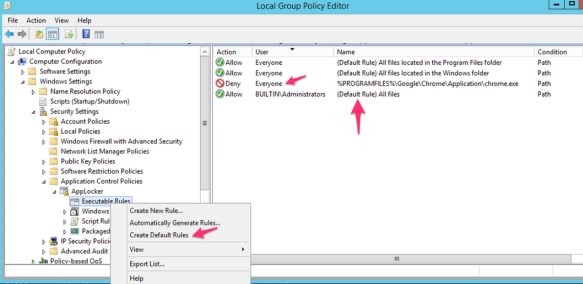
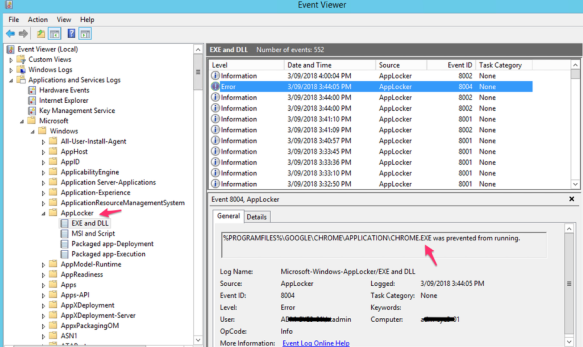
Following screenshot example shows default “Executable rules” which permits everything along with a rule to deny “Google Chrome” for everyone including Administrators; deny overrides other options.

AppWhitelist4-LocalGPO2

Set the Script Rules

Script rules options are same as the executable rules – Publisher, Path and File Hash along with Allow or Deny. Also, you can create default rules which allows everything.

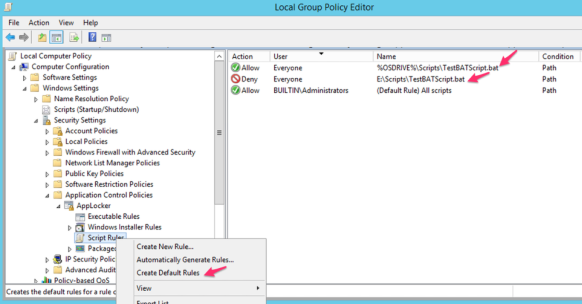
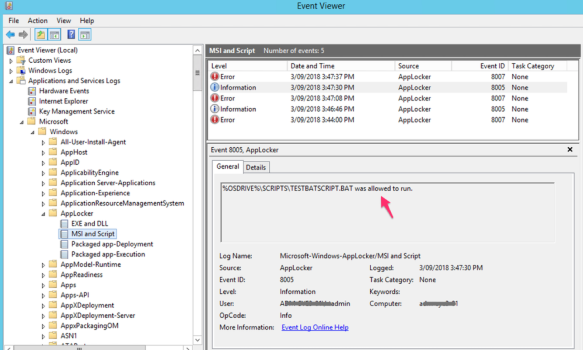
Following “Script Rules” screenshot shows the same BAT file “TestBATScript.bat” is allowed on the %OSDRIVE% which is the “C:\Scripts” for users and denied on the “E:\Scripts\” for everyone.

AppWhitelist5-LocalGPO3

If the above settings are pushed via GPO – it requires some time to applied to the destinations computers. This can be forced or the destination computer can be rebooted to get these settings immediately pushed.

Also, if we remove AppLocker settings on a computer – this takes few minutes (2-5min) to take effect as well; don’t expect result immediately.

Step3: Verification

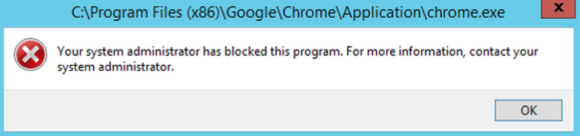
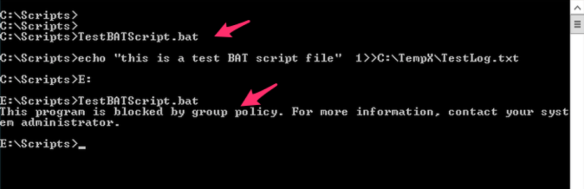
As we have configured “Deny” on the “Google Chrome” for all users – it will pop-up with the following error message when someone tries to open it up –

AppWhitelist6-ErrorChrome

Also, we have configured the “TestBATScript.bat” to allow execute from “C:\Scripts” and deny from “E:\Scripts\”; following screenshot says it all –

AppWhitelist7-ErrorScripts

Part 2 – Visibility and Analytics of Application Whitelisting using Splunk

A complete real time visibility and analytics of application executables and scripts across all the servers (100+ servers) are important to support the platform. Following are interesting items to application whitelisting analytics –

  • Who is executing what application
  • On what servers/system
  • What application are allowed
  • What application are denied
  • When/What time an application executed
  • Knowing the system applications
  • Knowing user defined applications
  • Sending alert email when an application/script execution is blocked

The above key interesting items about application whitelisting are available within AppLocker Windows Event Log files; the location of these logs are at Event Viewer -> Application and Services Logs -> Microsoft -> Windows -> AppLocker (EXE and DLL; MSI and Script). Example screenshots are following –

AppWhitelist8-EventLogs

AppWhitelist9-EventLogs2

To get real time analytics of what’s happening within AppLocker onto Splunk – we need to redirect AppLocker logs onto -> Splunk using the “Splunk Universal Forward”.

Setup Splunk Universal Forwarder (SUF)

SUF is free downloadable from www.splunk.com; download and install it on the target Windows computer. Ideally, it should be part of base Windows OS build template – so that we don’t need to install it manually every time.

During the SUF installation – we select the following “Security Log” only; although this is not a requirement for AppLocker to select security log; however, selecting security logs fulfil many compliance requirements. Select other type logs based on business requirements; also event logs selection can be done later on after the installation.

Make sure your Splunk server is up and running.

[select Windows Event Logs]

AppWhitelist10-SUF1

Enter the Splunk server IP address and receiving port number to redirect logs to.

[Enter the destination Splunk receiving server and port number]

AppWhitelist11-SUF2.png

After the installation – add the following lines onto the SUF local site config file “C:\Program Files\SplunkUniversalForwarder\etc\system\local\input.conf” –

[WinEventLog://Microsoft-Windows-AppLocker/EXE and DLL]
disabled = 0
evt_resolve_ad_obj=1

[WinEventLog://Microsoft-Windows-AppLocker/MSI and Script]
disabled = 0
evt_resolve_ad_obj=1

The above lines will redirect AppLocker “EXE and DLL” and “MSI and Script” logs onto -> Splunk; the “evt_resolve_ad_obj=1” will allow identify/show Active Directory user names.

Restart the SUF service.

At this stage AppLocker logs will start flowing onto the Splunk; based on index settings Splunk will automatically add these log entries onto the respective index or to the default index.

Following are few examples of AppLocker analytics dashboards within Splunk –

Screenshot of who/what action/what application/when/from is following; Splunk search string for this:

source="WinEventLog:Microsoft-Windows-AppLocker/*"| table host, User, Type, Message, _time

AppWhitelist12-Splunk11

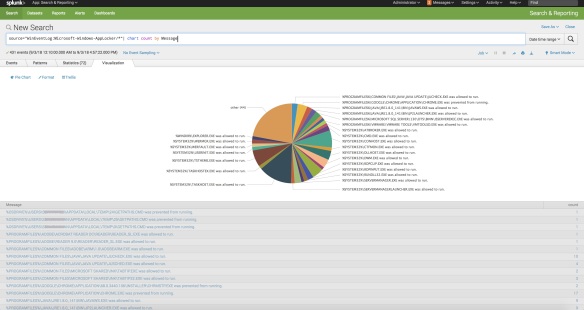
Screenshot of total number of applications following; Splunk search string for this –

source="WinEventLog:Microsoft-Windows-AppLocker/*"| chart count by Message

AppWhitelist13-Splunk22

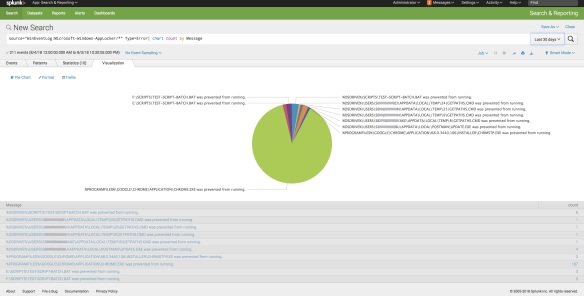
Screenshot of total number of denied applications is following; Splunk search string for this –

source="WinEventLog:Microsoft-Windows-AppLocker/*" Type=Error| chart count by Message

AppWhitelist14-Splunk33

Screenshot of email alert when there is a deny following; Splunk search string is following –

source="WinEventLog:Microsoft-Windows-AppLocker/*" Type=Error | table host, User, Message, _time

AppWhitelist15-Splunk44

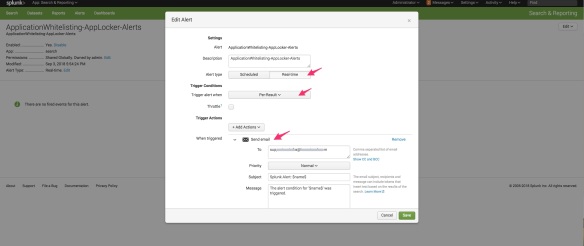
[Screenshot of Splunk alert email triggered on deny condition]

AppWhitelist16-Splunk5Main

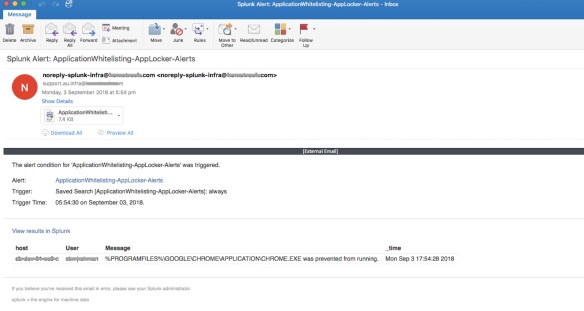
One of the key reason for alert emails – incase any “required” apps missed out from whitelisting – you will get details of the app even before the end user/team tells you to whitelist it.

Thats ALL!


Juniper SRX IDP (IDS/IPS) and SCREEN (DoS) Logs to Splunk

Juniper SRX IDP (IDS/IPS) and SCREEN (DoS) logs can be sent to a remote host via Syslog.

You might have come across IT security compliance requirements asking for visibility across your IDP and DoS attack event logs. One of the solution is sending all your security logs to a centralised logging system such as Splunk then perform all the required actions such as creating reports, dashboards and sending alerts from there.

In this example I have documented what are the configuration requirements to send Juniper SRX IDP and SCREEN logs to Splunk via Syslog.

Step 1: Setup Splunk to listen on UDP 514 (Syslog)

Make sure you have a running Splunk. Also you have configured Splunk to listen on UDP port 514 as syslog. This can be done via adding the following onto the file >> “/opt/splunk/etc/system/local/inputs.conf

[udp://514]
sourcetype = syslog

You can install the following Juniper Apps available in the Splunk app store:

-Splunk Add-on for Juniper
-Juniper Networks App for Splunk

If you do not have the above apps installed – you still can create your Splunk dashboards, reports & alerts manually based on the fields within the captured IDP and SCREEN logs.

Make sure SRX firewalls are able to talk to the Splunk server over the network.

Step 2: Setup SCREEN options

Make sure you have implemented SCREEN options. A bunch of options are available for SCREEN; here is some examples:

#set security screen ids-option internet-screen-options icmp ip-sweep
#set security screen ids-option internet-screen-options icmp ping-death
#set security screen ids-option internet-screen-options ip bad-option
#set security screen ids-option internet-screen-options ip spoofing
#set security screen ids-option internet-screen-options ip tear-drop
#set security screen ids-option internet-screen-options tcp syn-fin
#set security screen ids-option internet-screen-options tcp tcp-no-flag
#set security screen ids-option internet-screen-options tcp syn-frag
#set security screen ids-option internet-screen-options tcp port-scan
#set security screen ids-option internet-screen-options tcp syn-ack-ack-proxy
#set security screen ids-option internet-screen-options tcp syn-flood white-list PenTest-TempWhitelist source-address 123.xxx.xxx.xxx/32
#set security screen ids-option internet-screen-options tcp land
#set security screen ids-option internet-screen-options tcp winnuke
#set security screen ids-option internet-screen-options tcp tcp-sweep
#set security screen ids-option internet-screen-options udp flood
#set security screen ids-option internet-screen-options udp udp-sweep
#set security screen ids-option internet-screen-options udp port-scan
#set security screen ids-option internet-screen-options limit-session source-ip-based 1000
#set security screen ids-option internet-screen-options limit-session destination-ip-based 1000

Step 3: Enable logging within IDP Rulebase

Make sure you have an active IDP policy and you have also enabled IDP within security policies.

#show security idp active-policy
active-policy Recommended;

The above command shows current active policy “Recommended”; the default “Recommended” policy comes with “then notification log-attacks” along with “action recommended” as following:

then {
 action {
 recommended;
 }
 notification {
 log-attacks;
 }
 }

If you create a custom policy, make sure your policy is configured with “notifications log-attacks“.

Also make sure you have enabled IDP within “security policy”. Following is an example of enabling IDP within a security policy:

#set security policy from-zone sec-zone-source to-zone sec-zone-destination policy name-of-sec-policy then permit application-services idp

Step 4: Setup SRX firewalls to send logs to Syslog

SRX IDP logs are marked with RT_IDP.
SRX SCREEN logs are marked with RT_IDS.

You need to filter logs to capture the above while sending them to a remote syslog server.

#set system syslog host 172.16.xx.10 any any
#set system syslog host 172.16.xx.10 match "RT_IDP|RT_IDS"
#set system syslog host 172.16.xx.10 source-address 172.16.xx.5
#set system syslog host 172.16.xx.10 structured-data brief
#set system syslog file messages any any

Now generate some port scanning towards firewall interfaces where the SCREEN and IDP policies are applied. You can use “https://pentest-tools.com/network-vulnerability-scanning/tcp-port-scanner-online-nmap” to send some quick scan.

You should be able see SCREEN logs as following >

root@firewall-host-name> show log messages | match RT_IDS
Oct 13 14:53:22 firewall-host-name RT_IDS: RT_SCREEN_TCP: TCP port scan! source: 178.79.138.22:39267, destination: 118.xxx.xxx.xxx:990, zone name: sec-zone-internet, interface name: reth0.XXX, action: drop
Oct 13 14:53:43 firewall-host-name RT_IDS: RT_SCREEN_TCP: No TCP flag! source: 178.79.138.22:50779, destination: 118.xxx.xx.xxx:443, zone name: sec-zone-internet, interface name: reth0.XXX, action: drop
Oct 13 14:53:43 firewall-host-name RT_IDS: RT_SCREEN_TCP: SYN and FIN bits! source: 178.79.138.22:50780, destination: 118.xxx.xxx.xxx:443, zone name: sec-zone-internet, interface name: reth0.XXX, action: drop

Following are example of IDP attack event logs >

Oct 13 08:55:55 firewall-host-name 1 2017-10-13T08:55:55.792+11:00 firewall-host-name RT_IDP - IDP_ATTACK_LOG_EVENT [junos@2636.1.1.1.2.135 epoch-time="1507845354" message-type="SIG" source-address="183.78.180.27" source-port="45610" destination-address="118.127.xx.xx" destination-port="80" protocol-name="TCP" service-name="SERVICE_IDP" application-name="HTTP" rule-name="9" rulebase-name="IPS" policy-name="Recommended" export-id="15229" repeat-count="0" action="DROP" threat-severity="HIGH" attack-name="TROJAN:ZMEU-BOT-SCAN" nat-source-address="0.0.0.0" nat-source-port="0" nat-destination-address="172.xx.xx.xx" nat-destination-port="0" elapsed-time="0" inbound-bytes="0" outbound-bytes="0" inbound-packets="0" outbound-packets="0" source-zone-name="sec-zone-name-internet" source-interface-name="reth0.XXX" destination-zone-name="dst-sec-zone1-outside" destination-interface-name="reth1.xxx" packet-log-id="0" alert="no" username="N/A" roles="N/A" message="-"]

Now search in the Splunk with RT_SCREEN for SCREEN logs and IDP_ATTACK_LOG for IDP logs.

Here is few example screenshots from Splunk.

[Screenshot – Official Juniper App from Splunk App Store]

IDP-Splunk-OffcialJuniperApp-2

[Screenshot – IDP_ATTACK_LOG within Splunk]

IDP-Splunk-2

[Screenshot – SCREEN action logs]

IDP-Splunk-3

[Screenshot – Splunk Dashboard IDP Attack Events]

IDP-Splunk-4

The above dashboard has been created with the following search parameter:

IDP_ATTACK_LOG_EVENT 
| rename host as Firewall-Name
| rename attack_name as Attack-Name
| rename threat_severity as Threat-Severity
| rename action as Action
| rename policy_name as IDP-Policy-Name
| rename source_address as Attacker-IP
| rename source_interface_name as Src-Interface
| rename source_zone_name as Src-Security-Zone
| rename destination_address as Dst-Address
| rename destination_interface_name as Dst-Interface
| rename destination_zone_name as Dst-Security-Zone
| rename destination_port as Dst-Port
| rename nat_destination_address as Internal-Dst-NAT-Address
| table Firewall-Name, Attack-Name, Threat-Severity, Action, IDP-Policy-Name, Attacker-IP, Src-Interface, Src-Security-Zone, Dst-Address, Dst-Interface, Dst-Port, Internal-Dst-NAT-Address, Dst-Security-Zone, _time

[Screenshot – Splunk Dashboard SCREEN Attack Events]

IDP-Splunk-5

You can create Splunk “alerts” based on the same above!

Cisco IOS Events to Splunk – Track IOS Command Execution History

Cisco IOS event details can be send to an external system via “syslog”. Splunk server itself and Splunk Universal Forwarder both can act as a syslog server to accept logs from Cisco IOS devices.

To add more cream to Splunk log consolidation solution for Cisco IOS devices – there are few Splunk plugins already available on Splunk App store! These plugins display IOS events on nice colorful dashboards with graphs & charts.

Let’s talk about how we can get this solution in place.

Technical dependencies to get this solution are following –

1. Cisco IOS devices (routers, switches, wlc, asa) configured to send IOS event to Splunk via “syslog”
2. Splunk Indexer (actually this is the Splunk server)
3. (optional) to get nice dashboards it needs two Splunk Apps – (i)Cisco Networks Add-on (TA-cisco_ios) (ii)Cisco Networks (cisco_ios)

Regarding the solution design, there are two options as following –

1. Send logs to Splunk via Splunk Universal Forwarder; this design suits very well in a large infrastructure. Splunk Universal Forwarder can act as local “syslog” for IOS devices; picture below-

splunk-uf-pic-1

2. Send logs directly to the Splunk server –

splunk-server-pic-1

Installation technical procedures are following –

Step 1: Configure Cisco IOS to Send Logs to Splunk “syslog”

Following is an example configuration on a Cisco router –

router# config t
router(config)# logging trap notifications
router(config)# logging 1.1.1.1   ;IPAddr of Splunk syslog – if syslog is running other than UDP 514 – this needs to be specify here

The following commands will send Cisco IOS command execution history to syslog –

router(config)# archive
router(config-archive)# log config
router(config-archive-log-cfg)# logging enable
router(config-archive-log-cfg)# logging size 1000
router(config-archive-log-cfg)# hidekeys ;this will not send passwords to syslog
router(config-archive-log-cfg)# notify syslog
router(config-archive-log-cfg)#exit

Step 2: Configure Splunk or Splunk Universal Forwarder to Accept Logs on UDP://514

There are multiple ways to ways to do this. Adding new listener & sourcetype to “inputs.conf” works for both universal forwarder and Splunk server running on any platform.

On Linux/Unix the default location of this file is – $SPLUNK_INSTALLATION_DIR/etc/system/local/

On Windows the default location of this file is – x:\Program Files\SplunkUniversalForwarder\etc\system\local\

Add the following to the “inputs.conf” file –

[udp://514]
sourcetype = cisco:ios

Restart “splunk” service or “SplunkUniversalForwarder” service to get this change take effect.

If you add “sourcetype = syslog” – this will also work. The “Cisco Network Add-on (TA_cisco-ios)” transforms Cisco syslog to “cisco:ios” sourcetype automatically.

At this stage you should start getting logs coming on to Splunk. Execute some random commands on Cisco IOS and search for sourcetype=”cisco:ios” on Splunk search tab – you should be able to see logs like similar to following –

splunk-search-ciscoios-2

Step 3 (optional): Install Splunk Cisco Apps to Display IOS Events on Dashboards

Install the following two Apps from “Apps > Find More Apps > search Cisco” –

  1. Cisco Network Add-on (TA-cisco_ios)
  2. Cisco Networks (cisco_ios)

Installation is very straight forward – just click on the icon to install it.

If you still not seeing any logs on the Dashboard of Cisco Networks – this might be incorrect “sourcetype” issue and “TA-cisco_ios” is not doing the source type transformation – in this case change your source type to “cisco:ios” manually or you can log a support case with Splunk support to get the TA-cisco_ios fixed for you.

You should be able to see the following on Dashboards –

(the main dashboard)
splunk-cisco-dashboard

(command execution history – who has done what?)
splunk-cisco-exechistory

There are lot more you can find here on this dashboard – explore it.

Splunk user authentication with Windows Active Directory

Recently I have implemented Windows Active Directory authentication for Splunk. My Windows AD DS is a mix of Windows 2008 and Windows 2012; Splunk version is 6.x.

Here is below the technical steps-

1. Login to Splunk using admin account. Go to “Settings > Access Controls > Authentication method”. You should be able to see the available authentication methods here. Select “LDAP” and click on “Configure Splunk to use LDAP and map groups”. Screenshot –

Splunk-AD-1

2. Click on the “New” button. On the new page – this is the main LDAP strategy configuration settings page. Following are the main AD items that you need to enter here –

a. LDAP connection settings – based on connection settings Splunk will talk to AD.

LDAP strategy name: just a name.

You can have multiple LDAP strategies such as –  (i)strategy one for ready only access through an AD Group mapping to Splunk roles (user & power user), (ii)strategy two for full access through another AD Group mapping to other Splunk roles (Admin, Splunk-system-role) or similar.

Default Splunk roles are – admin, can_delete, power, splunk-system-role, user.

Port number: 389 (this is AD LDAP default)

Connection order: default

Bind DN: cn= AcctName Splunk,ou=yourSvcAcctOU,dc=yourDCName,dc=yourDCExtension

This is distinguished name of your Splunk account that you created in AD. It is recommended you should not use default AD administrator account or your own AD login here. You should create a dedicate account for Splunk – no AD administrative privilege required on this account.

Bind DN Password: enter the password of AD Splunk account

Splunk-AD-2

b. User Settings – Splunk will look for users in AD based on this

User base DN: dc=yourDCName,dc=yourDCextension

User base filter: leave this blank or you can enter specific AD search filter here

User name attribute: samaccountname

Real name attribute: displayname

Group mapping attribute: dn

Screenshot –

Splunk-AD-3

c. Group settings – Splunk will look for AD groups in AD based on this

Group base DN: cn=Group_Splunk_Access_Admins,ou=youGroupOUName,dc=yourDCName,dc=DCextension

This is the AD group that been created to grant access in Splunk.

Static member attribute: member

Screenshot-

Splunk-AD-4

d. Dynamic group settings – optional

e. Advanced settings – default is ok; however you can increase search request size limit.

Screenshot –

Splunk-AD-5

Click on the “Save”. If entered parameters are not correct – you won’t be able to save.

Now you should be able to see your LDAP strategy. Make sure it is enabled.

To see your AD group in Splunk, click on “Map groups”.

To map Splunk role(s) to an AD group – click on “Map groups > AD Group Name > available and selected roles”; screenshots –

Splunk-AD-6

Splunk-AD-8

Also you should be able to see AD users at “Settings > Access controls >Users”. Make sure AD users are member of the Splunk group that been created on AD.